
Macに全文検索エンジン『Solr』の環境を構築する方法
- 公開日:2019/02/11
- 更新日:2019/02/11
- 投稿者:n bit
Macに転置インデックスを作り表記揺れなども含めて全文検索できる全文検索エンジン『Solr』の環境を構築する方法を解説します。今回は『Solr』のバイナリデータをダウンロードして直接起動します。
この記事は約 分で読めます。(文字)
Macに全文検索エンジン『Solr』の環境を構築する方法
今回は『Solr』のバイナリデータをダウンロードして直接起動する方法を解説します。
Solrをダウンロード
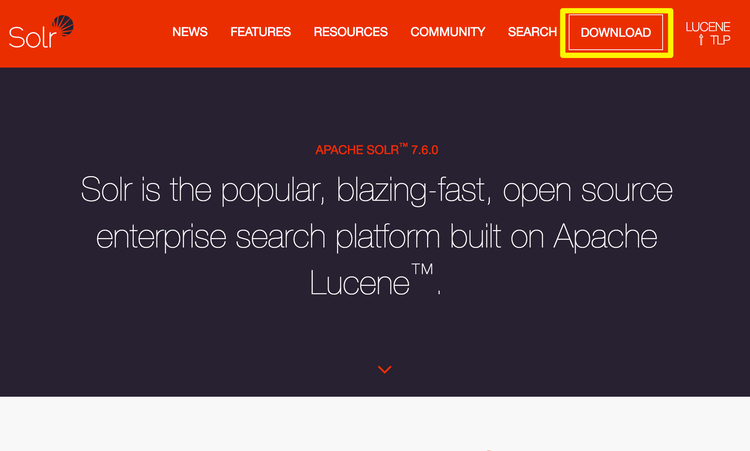
最初に『Solr』を公式サイトからダウンロードします。下記のサイトにアクセスしてダウンロードしてください。
サイトにアクセスしたら右上のダウンロードボタンをクリックします。
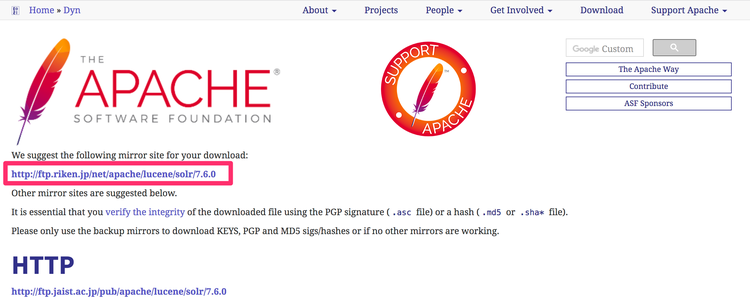
下記の赤枠部分をクリックしますとダウンロードできるファイルが表示されます。
右クリックして任意のフォルダにダウンロードしてください。今回は『tgz形式(solr-7.6.0.tgz)』を選択しました。
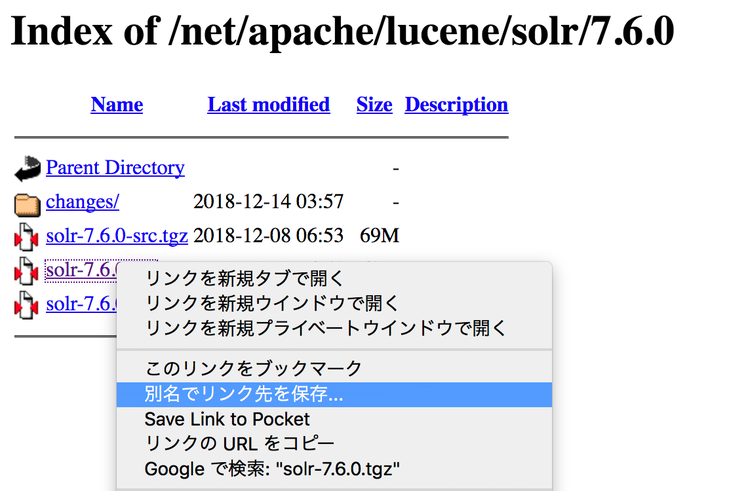
- ドキュメント内に『Solr』ディレクトリを作成しダウンロードしています。
Solrを起動
先ほどダウンロードした『Solr』を起動していきます。先ほど『Solr』をダウンロードしたディレクトリに『cd』コマンドで移動してください。
$ cd /Users/xxxxx/Documents/Solr
ダウンロードしたファイルを解凍します。
- バージョン名はダウンロードしたバージョンに合わせて適宜変更してください。
$ tar xzf solr-7.6.0.tgz
解凍した『Solr』のディレクトリに移動します。
$ cd solr-7.6.0
『Solr』の起動コマンドを実行しましょう。
$ ./bin/solr start -e cloud
Macに現在インストールされているJavaのバージョンが古いと以下のようなメッセージが表示されます。バージョンが適合していないので新しいバージョンのJavaをインストールしましょう。
Your current version of Java is too old to run this version of Solr.

We found major version 6, using command 'java -version', with response:

java version "1.6.0_65"

Java(TM) SE Runtime Environment (build 1.6.0_65-b14-468)

Java HotSpot(TM) 64-Bit Server VM (build 20.65-b04-468, mixed mode)


Please install latest version of Java 8 or set JAVA_HOME properly.


Debug information:

JAVA_HOME: N/A

Active Path:

/Users/xxxxx/.nvm/versions/node/v10.12.0/bin:/Users/xxxxx/.pyenv/shims:/Users/xxxxx/.pyenv/bin:/usr/local/bin:/usr/bin:/bin:/usr/sbin:/sbin
新しいJavaのインストール
- ※:最新のJavaがインストールされていた場合は上記メッセージが表示されません。このセクションを読み飛ばしてください。
現在インストールされているJavaのバージョンを確認しておきます。
$ java -version
出力結果
java version "1.6.0_65"

Java(TM) SE Runtime Environment (build 1.6.0_65-b14-468)

Java HotSpot(TM) 64-Bit Server VM (build 20.65-b04-468, mixed mode)
これをJava 8以上のバージョンに引き上げます。
JavaのインストールにはHomebrewの拡張『Homebrew Cask』が必要です。まだHomebrewのセットアップが完了していない方は、下記ページをご参照の上、先にインストールしておいてください。

Homebrewの基本とインストール方法・使い方
MacでPythonの環境構築や各種パッケージのインストールなど頻繁に利用されるHomebrew。Homebrewの基本的な知識や役割に関する情報とインストール…について解説しています。Macで各種環境構築を行うときには必須となるものです。
『Homebrew Cask』を使用できるようにするためHomebrewをアップグレードしておきましょう。
$ brew tap homebrew/cask
『Homebrew Cask』で新しいJavaをインストールするには下記コマンドを実行します。自動的に最新のJavaがインストールされます。
$ brew cask install java
下記のように表示されればインストール成功です。
==> Satisfying dependencies

==> Downloading https://download.java.net/java/GA/jdk11/9/GPL/openjdk-11.0.2_osx

######################################################################## 100.0%

==> Verifying SHA-256 checksum for Cask 'java'.

==> Installing Cask java

==> Moving Generic Artifact 'jdk-11.0.2.jdk' to '/Library/Java/JavaVirtualMachin

Password:

🍺  java was successfully installed!
特にバージョン指定しませんでしたので最新の11.0.2がインストールされました。バージョンの確認をしても新しいバージョンに変更されていることが確認できます。
$ java -version
出力結果
openjdk version "11.0.2" 2019-01-15

OpenJDK Runtime Environment 18.9 (build 11.0.2+9)

OpenJDK 64-Bit Server VM 18.9 (build 11.0.2+9, mixed mode)
それでは再度『Solr』の起動コマンドを実行しましょう。
$ ./bin/solr start -e cloud
今度は問題なく起動コマンドが実行されました。ここからSolrの『サーバ』を起動するための対話型セッションが開始されます。
最初のセッションに関しては、実行する濃度数の指定です。デフォルト([2])のままで良いのでreturnをクリックしてください。
Welcome to the SolrCloud example!


This interactive session will help you launch a SolrCloud cluster on your local workstation.

To begin, how many Solr nodes would you like to run in your local cluster? (specify 1-4 nodes) [2]:
次は、1つ目のノードが動作するポートの指定です。デフォルト設定(8983)で良いのでreturnをクリックします。
Ok, let's start up 2 Solr nodes for your example SolrCloud cluster.

Please enter the port for node1 [8983]:
2つ目のノードが動作するポートの指定です。デフォルト設定(7574)で良いのでreturnをクリックしてください。
Please enter the port for node2 [7574]:
2つのノード設定で初期化し実行開始します。参照用のコマンドが出力されます。
Creating Solr home directory /Users/xxxxx/Documents/Solr/solr-7.6.0/example/cloud/node1/solr

Cloning /Users/xxxxx/Documents/Solr/solr-7.6.0/example/cloud/node1 into

   /Users/xxxxx/Documents/Solr/solr-7.6.0/example/cloud/node2


Starting up Solr on port 8983 using command:

"bin/solr" start -cloud -p 8983 -s "example/cloud/node1/solr"


*** [WARN] *** Your open file limit is currently 10240.

 It should be set to 65000 to avoid operational disruption.

 If you no longer wish to see this warning, set SOLR_ULIMIT_CHECKS to false in your profile or solr.in.sh

*** [WARN] ***  Your Max Processes Limit is currently 2837.

 It should be set to 65000 to avoid operational disruption.

 If you no longer wish to see this warning, set SOLR_ULIMIT_CHECKS to false in your profile or solr.in.sh

Waiting up to 180 seconds to see Solr running on port 8983 [-]

Started Solr server on port 8983 (pid=48536). Happy searching!


Starting up Solr on port 7574 using command:

"bin/solr" start -cloud -p 7574 -s "example/cloud/node2/solr" -z localhost:9983


*** [WARN] *** Your open file limit is currently 10240.

 It should be set to 65000 to avoid operational disruption.

 If you no longer wish to see this warning, set SOLR_ULIMIT_CHECKS to false in your profile or solr.in.sh

*** [WARN] ***  Your Max Processes Limit is currently 2837.

 It should be set to 65000 to avoid operational disruption.

 If you no longer wish to see this warning, set SOLR_ULIMIT_CHECKS to false in your profile or solr.in.sh

Waiting up to 180 seconds to see Solr running on port 7574 [-]

Started Solr server on port 7574 (pid=48630). Happy searching!


INFO  - 2019-02-10 21:33:38.280; org.apache.solr.common.cloud.ConnectionManager; zkClient has connected

INFO  - 2019-02-10 21:33:38.292; org.apache.solr.common.cloud.ZkStateReader; Updated live nodes from ZooKeeper... (0) -> (2)

INFO  - 2019-02-10 21:33:38.304; org.apache.solr.client.solrj.impl.ZkClientClusterStateProvider; Cluster at localhost:9983 ready
起動が完了すると、データのインデックス作成に使用するコアを作成するように求められます。今回は『nlpwiki』と入力しました。
createコマンドで『nlpwiki』という名前のコアを直接作成する場合と同じです。
- $ ./bin/solr create -c nlpwiki
Now let's create a new collection for indexing documents in your 2-node cluster.

Please provide a name for your new collection: [gettingstarted]

nlpwiki
索引の分割数について聞かれます。こちらの設定もデフォルトのままで良いのでreturnをクリックしてください。
How many shards would you like to split nlpwiki into? [2]
次もデフォルト設定ですのでreturnをクリックします。
How many replicas per shard would you like to create? [2]
configSetの選択です。デフォルトで良いのでreturnをクリックします。もしもサンプルデータを利用したい場合は『sample_techproducts_configs』と入力してください。
Please choose a configuration for the nlpwiki collection, available options are:

_default or sample_techproducts_configs [_default]
『Solr』の起動に必要な対話型セッションはこれで全て終了です。以下のように表示されれば無事に『Solr』が起動しています。
Created collection 'nlpwiki' with 2 shard(s), 2 replica(s) with config-set 'nlpwiki'


Enabling auto soft-commits with maxTime 3 secs using the Config API


POSTing request to Config API: http://localhost:8983/solr/nlpwiki/config

{"set-property":{"updateHandler.autoSoftCommit.maxTime":"3000"}}

Successfully set-property updateHandler.autoSoftCommit.maxTime to 3000


SolrCloud example running, please visit: http://localhost:8983/solr
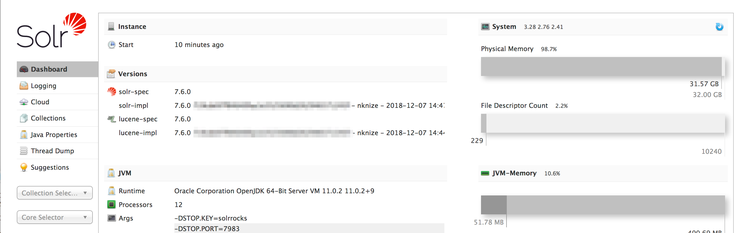
『http://localhost:8983/solr』にアクセスしてください。ブラウザで下記のように表示されれば問題ありません。
Solrの停止
起動した『Solr』の停止には以下のコマンドを利用します。
$ ./bin/solr stop -all今日のdot
全文検索エンジン『Solr』の起動は少し項目が多く感じますが実際にやってみるとそんなに時間はかかりません。基本的に手順通りやれば数分で起動できます。
【フリーランス向けの完全無料Pythonプログラミング講座】
dot blogではこの記事以外にも完全無料でフリーランス向けのPythonプログラミング講座を公開中です。フリーランスとして活躍し稼ぐための強力な武器となりますよ。

Python入門講座【無料のプログラミング学習講座】
最近特に注目度が高くなってきているプログラミング言語Python。転職、フリーランス、独立・起業を検討中、日々の業務が忙しい社会人等は今こそ身に付けておきたいスキルの1つ。初心者向けにやさしいプログラミング学習内容のPython入門講座を無料で公開。